October 2, 2020
One of the big hurdles for me when switching from a Mac based audio setup was the potential loss of access to my expensive collection of VST plugins (because a lot of developers still ignore the Linux platform as if it was 1995 even though it has never been easier to make and release cross platform plugins). Little did I know that almost all of them would run just fine on Linux using the wine Windows compatibility layer and the yabridge or linvst VST plugin bridging software.
The workflow for getting set up though was quite difficult before I switched to Arch based distributions than on other Linux distributions (thanks to the Arch User Repository (AUR)), and even though it is significantly easier on Arch and Manjaro, it still has some quirks in the setup process which I have tried to collect here as a set of instructions and notes for getting started.
Disclaimer There may be licensing problems in doing this operation on some plugins. I talked to a commercial plugin developer about using their plugins on Linux and they said that it sounded interesting (because they developed everything on Linux anyway (but did not make releases for Linux)) but that I was probably in conflict with their licensing when doing so. I don’t take responsibility for anyone breaking any laws here.
Preparations
Enable 32 bit repositories
To install wine (and enable 32 bit support) you need to do enable the multilib repositories in your pacman configuration. If you are running Manjaro, this is already done for you so you can skip this section.
By doing this, you get access to a range of 32 bit software that can be run on a 64 bit machine.
Open up /etc/pacman.conf in your favourite text editor. E.g. in vim:
sudo vim /etc/pacman.conf
And then uncomment the multilib section:
[multilib]
Include = /etc/pacman.d/mirrorlist
And then upgrade your system:
sudo pacman -Syu
See the arch wiki for more information.
wine
To be able to run Windows software on Linux, you need to install wine. Wine is a huge subject in itself (and I definitely do not master it at all), but it basically runs as a compatibility layer between windows software and your linux system.
If you followed the previous step by enabling multilib, you should now be able to install wine like this:
sudo pacman -S wine
Method 1: yabridge
Using yabridge is my favourite way of using vst plugins on Linux these days. It is the simplest and easiest method and includes a lot of really good documentation. In fact, the documentation is so good that I won’t go into too much detail here about it - simply check out the Github page for it or visit the discord chat server associated with it.
Installing on Arch and Manjaro is easy:
yay -S yabridge
This gives you access to the command line tool yabridgectl which is the main interface for you. After installing a vst plugin using wine, all you have to do is make sure yabridge knows the path to the folder containing the plugin and then simply run yabridgectl sync and that’s it.
Tip: Migrating an installation with yabridge
I recently had to migrate my wine installation to another computer, since my primary computer died on me. This was surprisingly easy - I simply moved the $HOME/.wine folder to my new computer’s home directory, installed wine and wine-mono and then ran yabridgectl sync and I was up and running.
Method 2: Linvst
This method involves using linvst to enable vst support. It is used to create bridges between the windows .dll files that VST plugins are delivered in and creates a Linux equivalent .so file. Managing this process can be complicated and a bit of a pain, but thankfully there is a program to do it all for us: https://github.com/Goli4thus/linvstmanager.
Linvstmanager is the main program we use to keep track of vst plugins, where they are and if they are supported on our system.
There are packages for linvstmanager and all of the linvst bridges on the AUR that can be installed using yay or another aur helper system:
yay -S linvstmanager-git linvst-bin linvst3-bin linvst-x-bin linvst3-x-bin
Setting linvstmanager preferences

Before we are able to use linvstmanager, we need to tell it where the vst bridges we installed along with it are in our system.
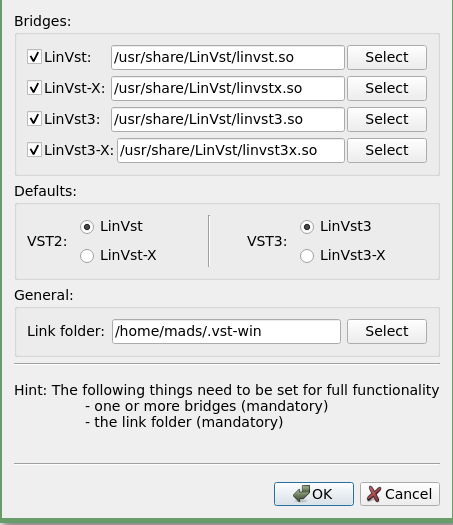
If you used the packages from the AUR, they are probably in /usr/share/LinVst. Select and find them in your preferences.
Next up you need to set a folder that will contain your plugins. This is called the Link folder. This is the folder your DAW needs to read from when scanning for VST Plugins. I have put mine in a hidden folder called .vst-win in my user’s home directory but you can put it anywhere.
Part 0: Installing a plugin
This is the workflow I use for downloading and installing a plugin. See the linvstmanager documentation for a more thorough explanation.
Part 1: Install the plugin to your wine drive
- Go to the developer’s website and download the
.exefile for installing the plugin on a Windows system. - Open up a terminal and execute
wine path/to/plugin.exe - Follow the install instructions of the vst plugins you are installing. Note where you are putting the
.dlland/or.vst3files at the end of the installation.
This will leave the plugin files in your wine installation’s “C” drive which is probably in your home folder: ~/.wine/drive_c
Part 2: Find and enable the plugins in vstmanager

- Open
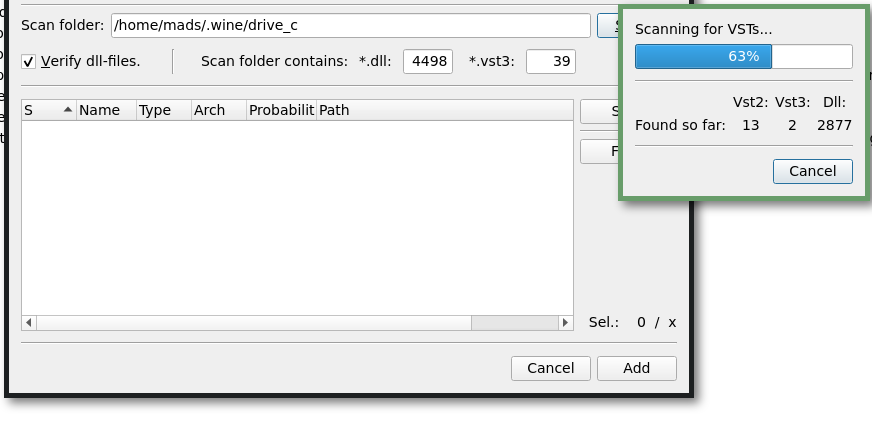
linvstmanagerto create a bridge to your new plugin. - Scan for your plugins (press
ALT+sor go to the menuEdit->Scan) - Choose the scan folder by clicking
select. If you don’t see any hidden folders (starting with a.), you can right click and chooseshow hidden files. Then go to.wineanddrive_c. - Once the scan is finished you should get a list of files. Find the ones you want to use and press
sto select. - Click
Add
Part 3: Enable the plugin
In the main window of linvstmanager you should now see your plugin listed with a no so warning next to it.
- Update by pressing
uor going to the menuEdit->Update - Right click on the plugin you just added and click enable. It should now turn green.
Part 4: Save settings
Before finishing off, save the settings.
Go to menu File->Save or press Ctrl+s
Scan for the plugins in your DAW

You should now be able to use your newly bridged Windows VST plugins in your DAW. Point it to the link folder you set in your linvstmanager preferences and scan for the plugins.
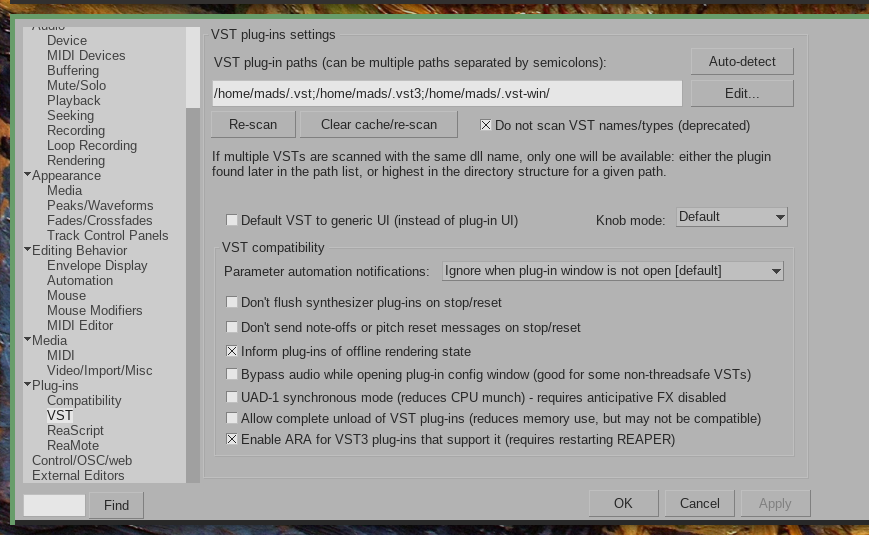
In Reaper (which, by the way, has an amazing Linux native installation) for example, you can add the Link folder as a path in your Preferences.
Find the VST tab and add the Link folder path you set in linvstmanager.
The syntax for this consists of full path names with semicolons (;) in between: /a/full/path;/another/full/path
After adding the path, click re-scan.
An alternative approach: Using Carla
An alternative approach is to use carla, which has been outlined nicely by kindohm / Mike Hodnick in this post.
Troubleshooting
- If you get errors about a kernel32 dll missing, the solution for me was to run
winetricksand runcreate prefixand install wine mono.
